Important Notes
- Both Rit DyeMore and Rit ProLine require heat so you need to make sure that anything you are dyeing is heat safe, and that you use the right safety gear to avoid injury or staining.
- Always do a small test first to see how your dye will react with the item you are dyeing.
- Do not dye in or use tools that you then use for food.
- Always have enough room in your container to be able to stir the material for an even color.
- Work with one piece at a time for sheet Worbla, or make sure that the pieces will not touch in the dyebath or they may stick.
- Stir or agitate gently or Pearly Art may deform and stick to itself.
- If Pearly Art or TranspArt touch the bottom of your pot, they may get darker ‘spots’.
Instructions
Dyeing TranspArt with Rit DyeMore:
TranspArt is the most commonly dyed Worbla plastic. People dye TranspArt to create flames, ice and water effects.
- Cover work area around stove with plastic table cover or newspaper and have paper towels handy to protect against any possible spills. Gather supplies.
- Wear rubber gloves to protect hands from getting stained and to insulate them when working with hot water.
- Due to the complexity of dyeing synthetics, you must use the stovetop method to maintain an almost boiling temperature for the duration of your dyeing (200 F° or greater).
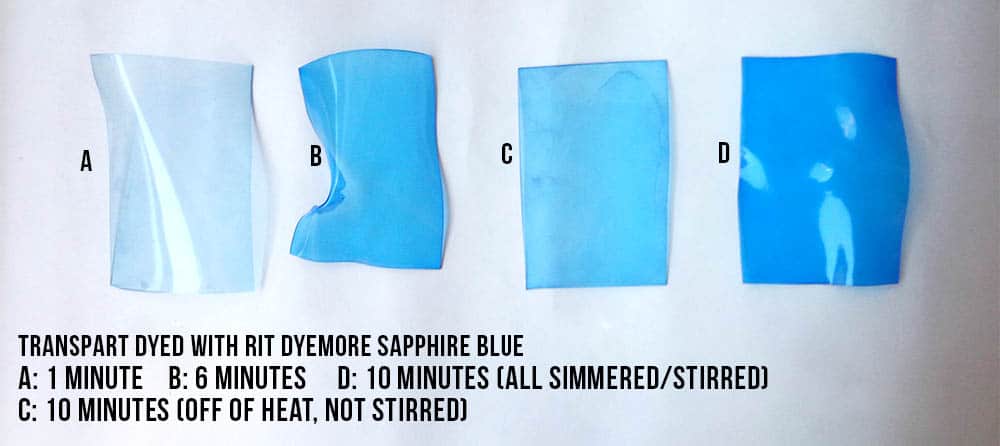
- Fill a stainless steel pot with enough water for the TranspArt to move freely. We recommend 3 gallons of water per pound of material being dyed. When dyeing a sheet of TranspArt plastic, we used 10 cups of water. Add 1/4 cup of Rit DyeMore in a color of your choosing. The picture below features Rit DyeMore in Sapphire Blue.
- Add TranspArt to the dyebath and continuously stir. If left in the pot without stirring, the TranspArt will become splotchy. To help the TranspArt absorb the dye, maintain consistent heat.
- Stir the TranspArt until the desired color is achieved. Here we feature how the color will change depending on the length of time in the dyebath.
- Remove TranspArt from dyebath and set out to cool and dry.

Dyeing TranspArt with Rit ProLine:
When using our ProLine dye, follow the same steps as when dyeing with Rit DyeMore. Below is an example of TranspArt dyed with ProLine using roughly the same amount of water (10 cups) and starting with one scoop of Rit ProLine. The dye used in the photo was Scarlet. One scoop yielded a very light/faint Scarlet color but adding a second scoop yielded a more intense color. The depth of the color will change based on the total time the TranspArt is in the dyebath. See how the color intensifies after 1 minute, 5 minutes and 10 minutes in the dyebath. 
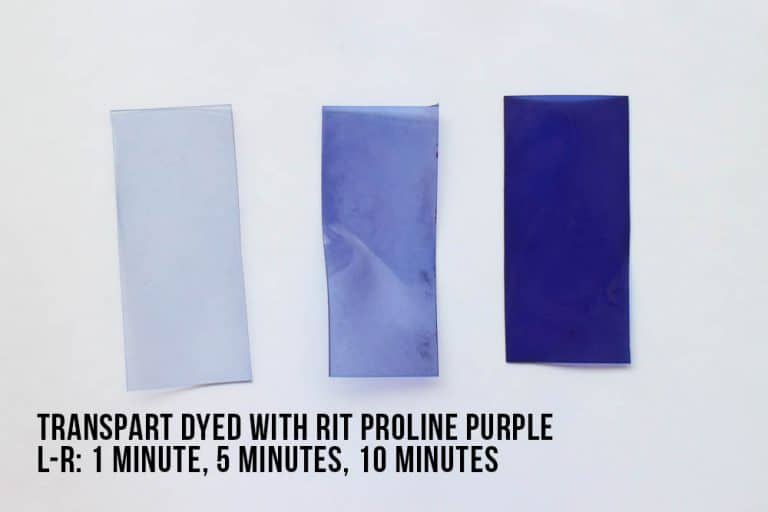
Here is another set of TranspArt sheets dyed with our ProLine dye in Purple. The depth of the color will change based on the total time the TranspArt is in the dyebath. See how the color intensifies after 1 minute, 5 minutes and 10 minutes in the dyebath. The 5 minute sample has more uneven color as this piece wasn’t stirred as often. Remember to stirs continuously for even results. 
Rit dyes leave very little residue when dyeing Worbla products. There is no residue left when on dyeing TranspArt with our DyeMore liquid dye and minimal residue when using our ProLine dyes.
Dyeing Worbla’s Deco Art with DyeMore:
Worbla’s Deco Art is a polyester pellet plastic used for sculpting and building dimension, as well as molding. Deco Art bonds very well with other Worbla Plastics and is often used for surface details and hiding seams. Being able to add color in advance allows you to create pieces that don’t need paint, and surfaces that can’t have the color chipped or worn away.
- Cover work area with plastic table cover or newspaper and have paper towels handy to protect against any possible spills. Gather supplies.
- Dyeing small batches of plastic, use 1/8th a cup of water and a few drops of DyeMore in a small ramekin. Add in small batches of Deco Art and stir.
- Microwave for 30 seconds, then for short bursts of 5-10 seconds each until the water has boilded (microwave times may vary). This allows for a quick way to heat the pellets and have them absorb the dye. Please note: only use the microwave method if you (a) own a microwave (b) will watch the entire process. Do not microwave without enough water to cover the plastic. Do not use a dish you will eat out of later.
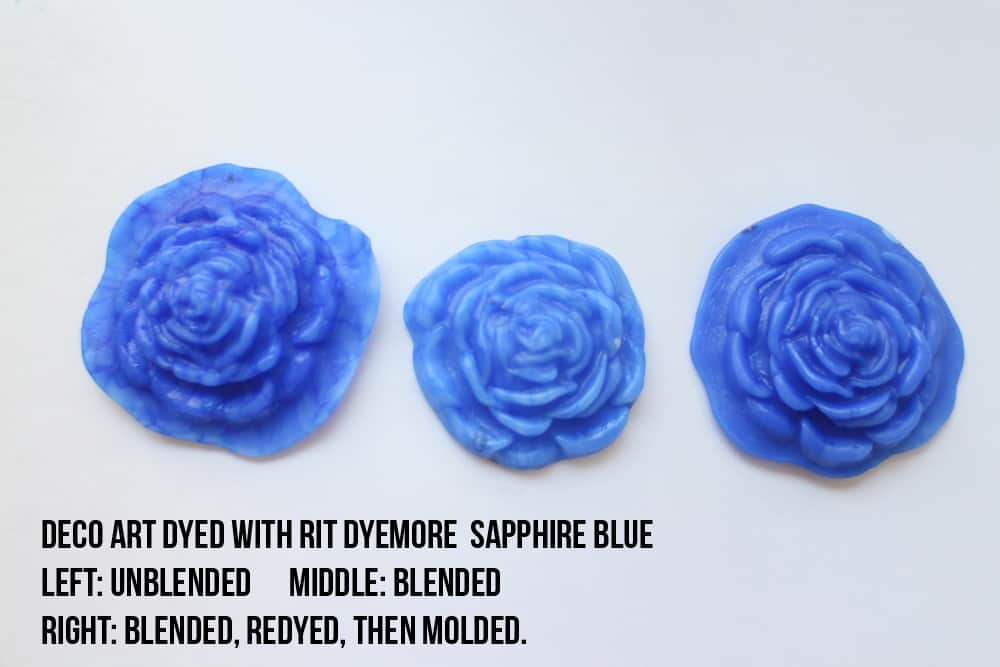
- Remove pellets, let them dry for a moment and then press into a mold right away without reheating. This method may give somewhat of a molted effect. Another option is to knead the pellets together first into one fluid bit of plastic and then press it into a mold. This will create less of a molted effect. One final option is to blend the dyed pellets together and press them into a flat shape. Then add the flat shape back into the warm dye bath for another 2 minutes. Remove from dyebath and press into a mold. This may provide the most even color.
If microwaving isn’t an option:
- Cover work area with plastic table cover or newspaper and have paper towels handy to protect against any possible spills. Gather supplies.
- Heat water in a kettle, pour into a container you WILL NOT use for food.
- Add a few drops of DyeMore and then the pellets.
- Stir occassionally until the pellets have absorbed dye.
- Remove pellets, let them dry for a moment and then press into a mold right away without reheating. This method may give somewhat of a molted effect. Another option is to knead the pellets together first into one fluid bit of plastic and then press it into a mold. This will create less of a molted effect. One final option is to blend the dyed pellets together and press them into a flat shape. Then add the flat shape back into the warm dye bath for another 2 minutes. Remove from dyebath and press into a mold. This may provide the most even color.

Dyeing Deco Art with ProLine:
Follow the same steps as the Deco Art DyeMore process. We recommend kneading the pellets together, pressing them into a flat shape and putting it back into the dyebath for another 30 seconds, then knead again before pressing into a mold. 
Dyeing Crystal Art with DyeMore:
When you need dimensional translucent effects, Worbla’s Crystal Art offers a moldable, sculptable translucent plastic that can be used for gems, water effects, light diffusing and so much more.
- Cover work area with plastic table cover or newspaper and have paper towels handy to protect against any possible spills. Gather supplies.
- Use a steel pot for the dye process. Heat water until almost boiling, 200 F° or greater.
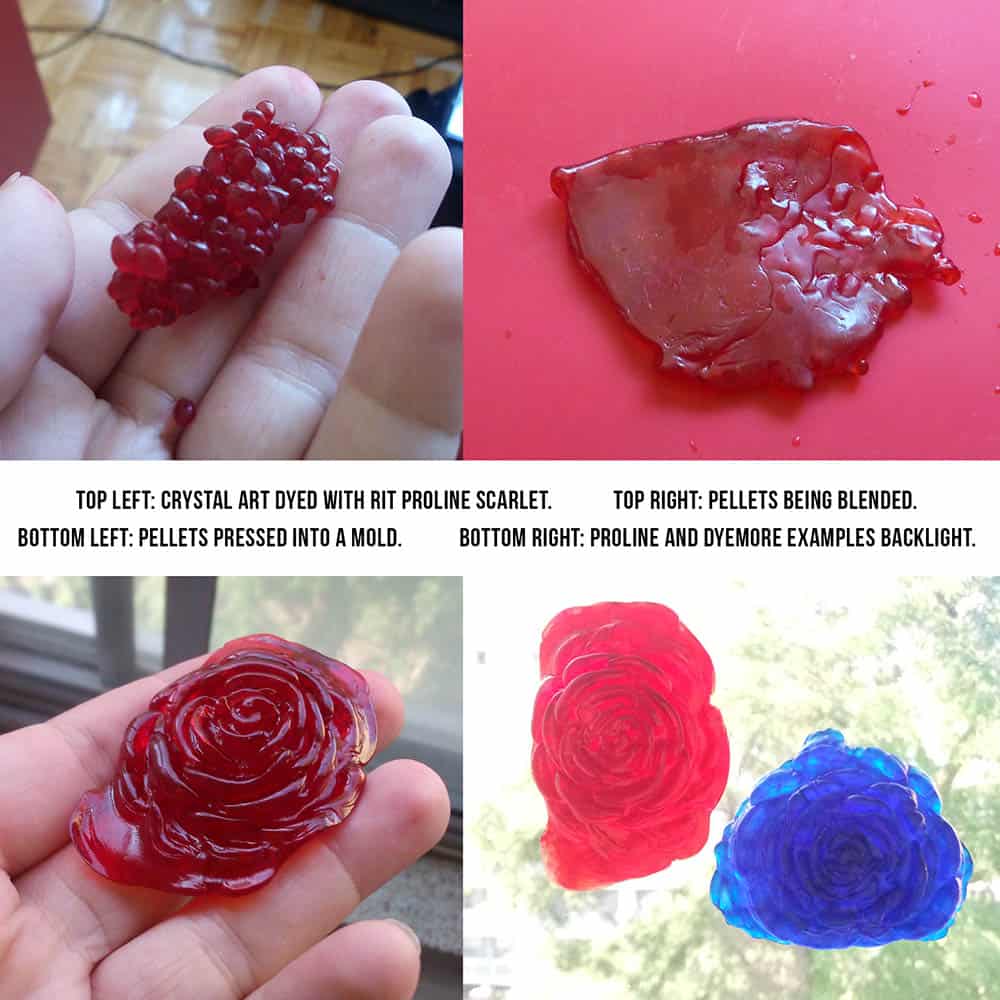
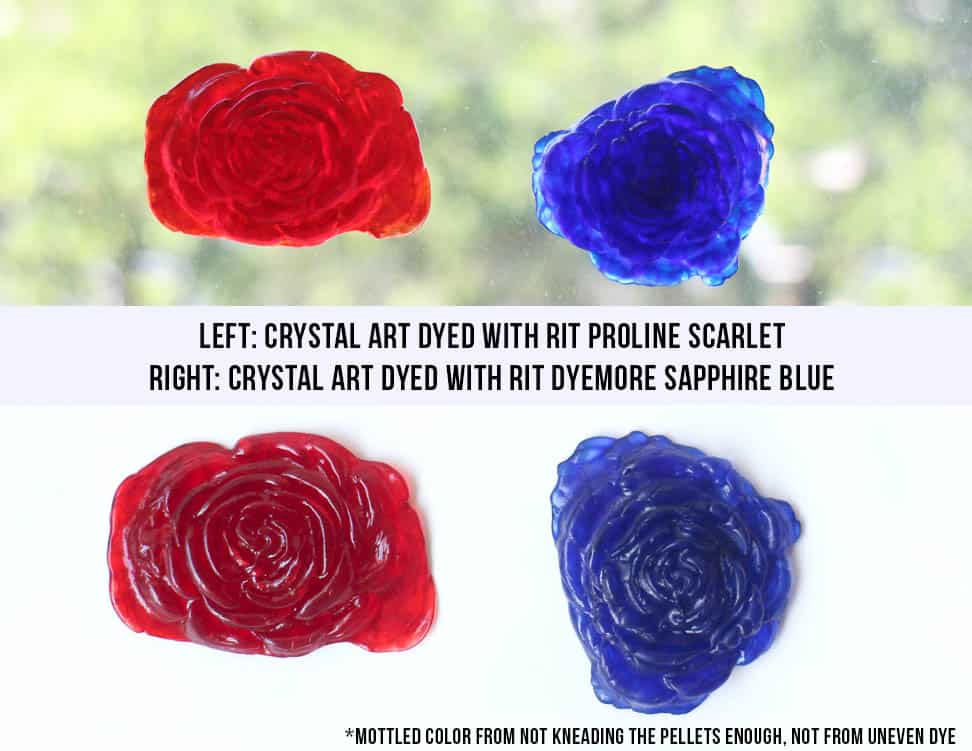
- Add dye (the amount of dye will vary based on the quantity you are dyeing) and stir. Crystal Art takes the dye very well, so much so that you will want to work with very little dye to keep a more translucent effect. We recommend starting with just a few drops of dye. Also, the Crystal Art absorbs the dye from the water. Meaning, when we dye the second piece of Crystal Art in the same container/water it came out lighter, as there was less dye to absorb.
- Place Crystal Art pellets in a metal strainer to keep them together and allow them to soak in the water. Once desired color is achieved, remove pellets from the dyebath.
Dyeing Crystal Art with ProLine:
If using the microwave method, you will need a strong microwave in order to melt the pellets. You may need to heat the pellets further to shape them. Please keep this in mind while testing and plan to have something to drain into. If you are using the stovetop method, follow these instructions.
- Cover work area with plastic table cover or newspaper and have paper towels handy to protect against any possible spills. Gather supplies.
- Use a steel pot for the dye process. Heat water until almost boiling, 200 F° or greater.
- Add dye (the amount of dye will vary based on the quantity you are dyeing) and stir. Crystal Art takes the dye very well, so much so that you will want to work with very little dye to keep a more translucent effect. We recommend starting with just one scoop of ProLine dye.
- Place Crystal Art pellets in a metal strainer to keep them together and allow them to soak in the water. Once desired color is achieved, remove pellets from the dyebath.
- Blend pellets together into a flat surface, reheat in dye bath and then press into the mold. Make sure to wear gloves or rinse the pellets before reshaping as they may leave residue on your fingers.


Dyeing Pearly Art with DyeMore:
Pearly Art is excellent for projects with minimal priming for a smooth finish, fine sculptural details, and frosted light effects.
- Cover work area with plastic table cover or newspaper and have paper towels handy to protect against any possible spills. Gather supplies.
- Use a steel pot for the dye process. Heat water (we used 10 cups) until almost boiling, 200 F° or greater.
- Add 1/4 cup of DyeMore and stir well. Make sure there is enough water in the steel pot to keep the plastic from touching the bottom of the pot while being stirred.
- Add Pearly Art to the dyebath. If Pearly Art sits at the bottom of the pot for an extended period of time, it will get marks from where the plastic melted.
- Once desired color is achieved, remove from the dyebath. We found there is a clear progression of color intensity over a period of time.
Dyeing Pearly Art with ProLine:
Follow the same steps as DyeMore. Instead of using 1/4 cup of DyeMore, use 1 scoop of ProLine. The ProLine will absorb quickly so much so that there was nearly no difference in color between 5 minutes and 10 minutes.

