
Supplies
- Cotton Fabric, 8 yards
- Rit All-Purpose Liquid Dye in Golden Yellow and Sunshine Orange
- Rit ColorStay Dye Fixative
- Heavy Duty White Thread
- Cord
- 72” wooden dowels, four
- Yardstick
- Measuring Tape
- Fabric Chalk
- Scissors
- Straight Pins
- Sewing Machine
- Measuring Cup and Spoon
- Baking Rack and Tray
- Paper Towels
- Gloves
- Rubber bands
- Dish Detergent
- Salt
- Container for Dyeing
- Plastic Table Cover
- Iron and Ironing Board
Time
Total: {{ partial.tHQT.total }}
Difficulty
Intermediate Total: {{ partial.tWD4.total }}
Instructions
- Refer to sewing pattern below and draw panels onto cotton fabric using the yardstick and fabric chalk.
- Carefully cut out each panel using scissors.
- Hem the two inner straight edges and bottoms of the front lower panels using a ¼” seam.
- Repeat to hem the bottom and top of all three side panels, as well as the top of the front upper panel and dowel sleeves
- To assemble the front panel, lay three front pieces so they match up. The front panels will overlap a few inches. Once the panels line up, flip the top panel downward so that right sides are facing with the edges lined up. Sew together using a ¼” hem.
- Once front panel is assembled, it’s time to tie-dye. To prepare, prewash panels and sleeves in warm, soapy water to remove any finishes that may interfere with dye absorption.
- Cover work area with plastic table cover and gather supplies.
- Lay one panel flat on the surface and gather towards the center to create vertical pleats. Secure with rubber bands every 6”. Repeat for each panel and dowel sleeve.
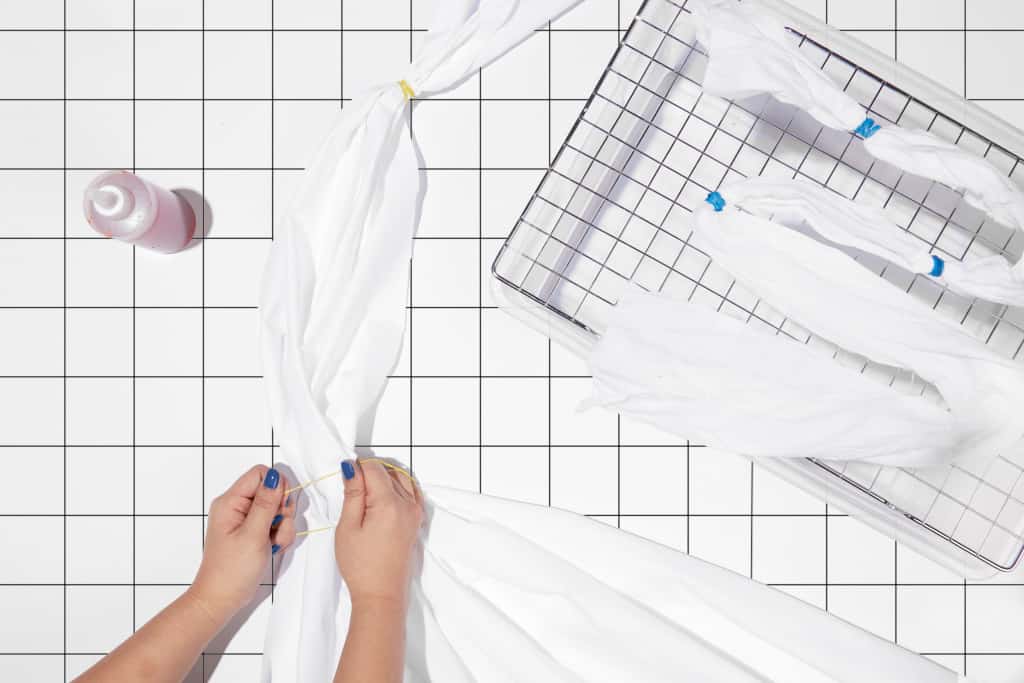
- Wearing rubber gloves, mix 2 tablespoons of well-shaken liquid dye or 1/2 teaspoon of powdered dye with two cups of hot tap water. (For this process, you’ll have to refill the bottles for each panel).
- Add 1 tablespoon of salt.
- Pour into squirt bottle and shake well.
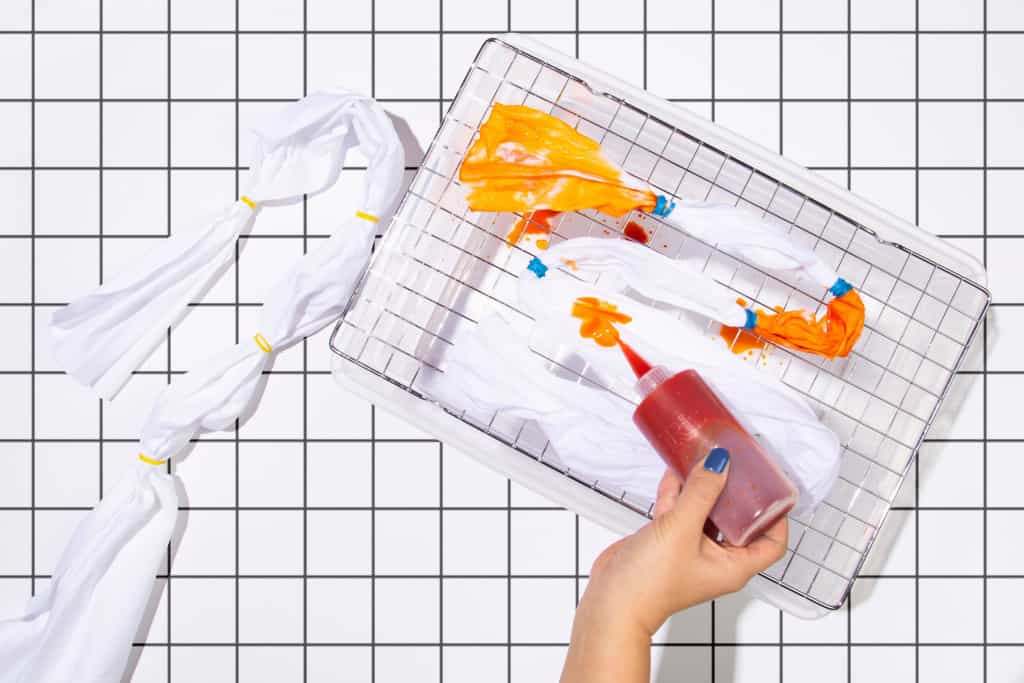
- Place bound fabric on baking rack with tray under it. This is very important because it keeps the dye from puddling under the fabric.
- Apply dyes as desired. We alternated between Golden Yellow and Sunshine Orange on the panels and reversed it for the dowel sleeves.
- To set the dye, do the following while the fabric is still tied up:
- Apply Rit ColorStay Dye Fixative with a squeeze bottle, which will enhance the colors of reducing bleeding. Mix 2 tablespoons of well-shaken ColorStay Dye Fixative with water and apply liberally to both sides of fabric.
- We strongly recommend using your microwave, as long as the fabric does not have any metal parts on it. After applying ColorStay Dye Fixative, wrap the fabric in plastic wrap and seal the edges. Place the wrapped fabric on a paper towel in the microwave and heat for 2 minutes. Plastic will puff up, creating a heat chamber that helps bond the dye with the fabric. Once the microwave is done, remove the fabric and open the plastic, letting it cool down.
- If a microwave is not available or feasible, lay the wrapped fabric out in the sun for an hour.
- Rinse in cool water until water begins to run clear.
- Carefully remove rubber bands with scissors and unfold the fabric.
- Wash in cold water with mild detergent, rinse and dry.
- Once dry, give your panels and dowel sleeves a quick iron so they’re wrinkle-free.
- To assemble, place two side panels with right sides facing. Fold one sleeve in half lengthwise with wrong sides together, and place in-between with raw edges aligned.
- Pin and sew together using a 1/2” hem. Make sure to bath stitch at the tops and bottoms.
- Repeat steps 19-20 until all sleeves are attached.
- Flip TeePee right side out and insert dowels.
- Spread dowels apart until TeePee stands as desired. Wrap cord around the intersection points of the dowels and secure with a knot.


Posts You May Like
