
Supplies
- Rit All-Purpose Liquid Dyes
- 14” Tree Form (vine cone, styrofoam or papier-mache)
- White Cotton Yarn - medium weight, #4
- Scissors
- Wide-Toothed Comb
- Firm Cardboard, 3.5” square
- Measuring Spoons
- Salt
- Containers for mixing dye
- Containers for dip-dyeing, ideally with a 3” depth
- Glue Gun
- Plastic Gloves
- Paper Towels
- Plastic Table Cover
- Chalk
- Ruler
Time
Total: {{ partial.tBAJ.total }}
Difficulty
Beginner Total: {{ partial.t6HJ.total }}
Instructions
TASSEL CONSTRUCTION
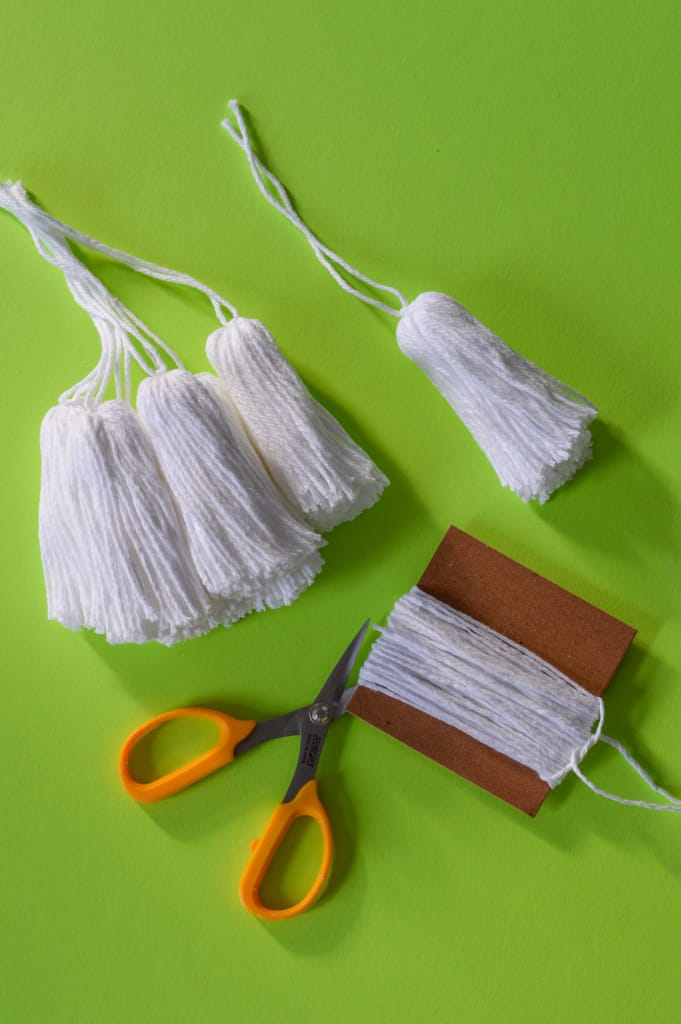
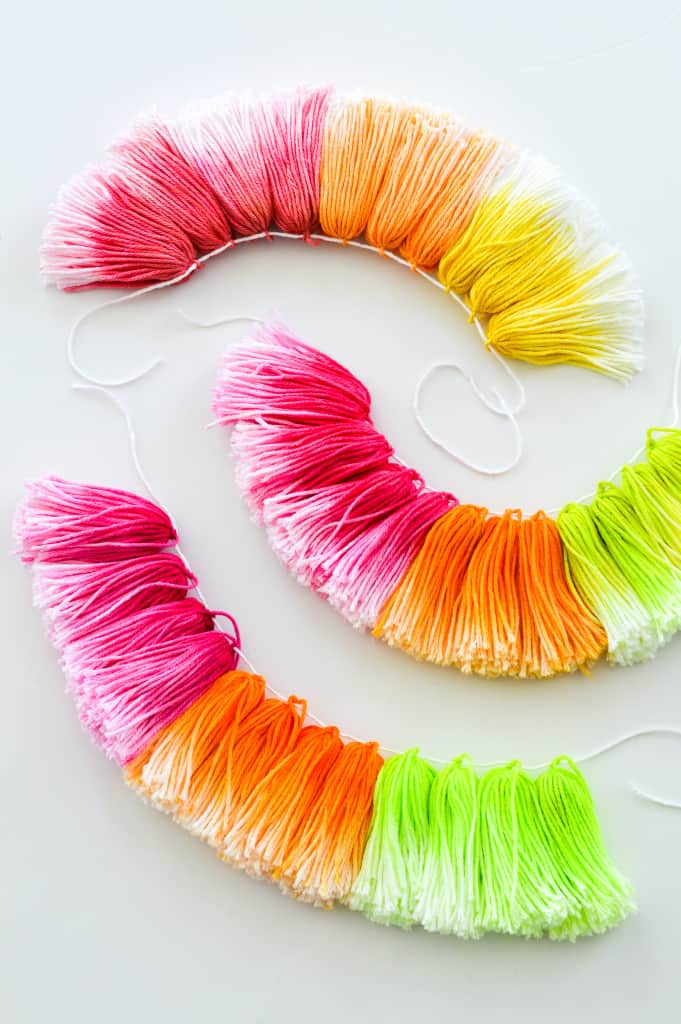
- Cut 11” lengths of white cotton yarn to use for the tassel ties. You will need 50 tassels to cover a 14” tree base.
- Wrap cotton yarn around the 3.5” cardboard sixty times, then cut the end. Tip: this goes much quicker if you use several balls of cotton yarn at the same time (think 20 wraps rather than 60).
- Thread the 11” piece of yarn under the yarn on one end of the cardboard. Tie once loosely, then cut through all the yarn on the other end of the cardboard. Carefully take the tassel off the cardboard, and pull the 11” piece of yarn tight and tie a full knot. It is important that this is tight, so that the yarn cannot come loose from the tassel.
- Once all of the tassels have been made, rough trim the bottoms. It is not necessary to get the bottoms perfectly even, as the shagginess is part of the charm.
- Smooth each tassel so that the strands are not tangled – if you have a wide-toothed comb, this is the perfect tool.

DYE PREPARATION
- Cover your work surface with the plastic tablecloth. Protect your hands with the plastic gloves.
- Using the Rit Dye Color Formulas, select the colors for the tree. For this project, we’re using Neon Green, Shocked Yellow, Poolside, Island Aqua, Neon Purple and Pastel Lavender.
- Make sure to select the small item size for the dye formula since this project requires small amounts of dye. Cut the small item formulas in half to work in 2 cup batches. Two cups of dye will dye up to 15 tassels.
- Label the dye containers with the color names, then mix the dyes.
- Add 1 tbsp of table salt to each dye color and mix.
- Test the colors by cutting several 6” pieces of the white cotton yarn and soaking in hot water. Heat the dyes in the microwave for one minute on high. Squeeze the water out of the yarn strands, and put one in each dye color (hang the end over the edge so the yarn doesn’t fall in). After 5 minutes, take the strands out and rinse under hot water. If the color is too dark, add water to the dye. If the color is too light, add more dye.

DIP-DYEING PROCESS
- If you are making the tassel tree as shown in the photos, dye 12 Neon Green tassels, 10 Poolside tassels, 11 Neon Purple tassels, 6 Shocked Yellow tassels, 5 Island Aqua tassels, and 6 Pastel Lavender tassels.
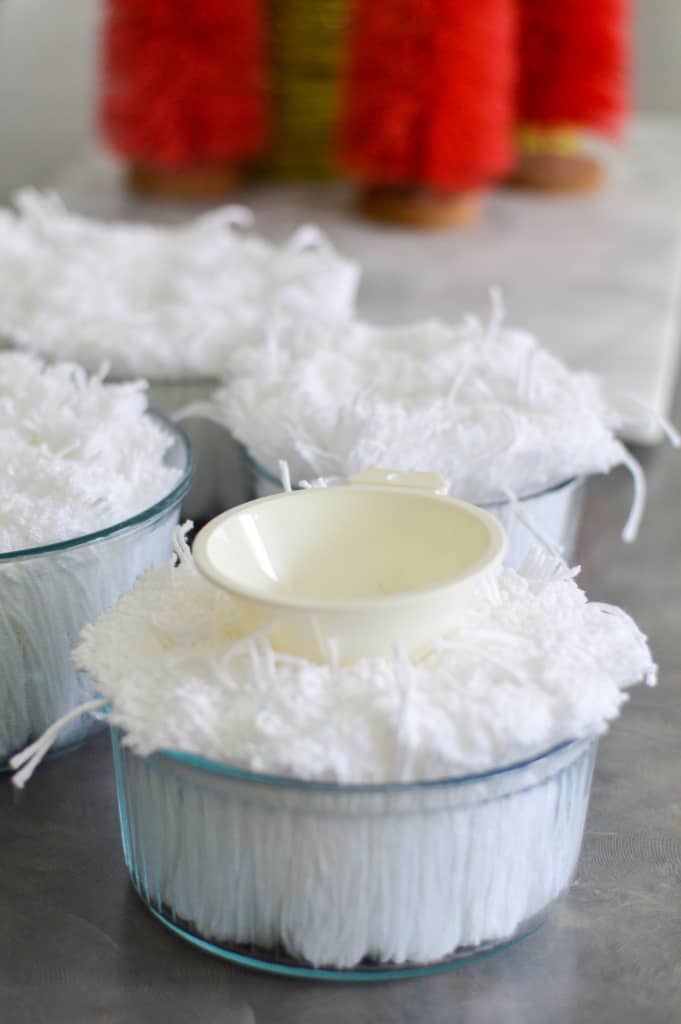
- Place tassels upside-down into the dip-dyeing containers, with the tops of the tassels in the bottom of the container. The bottoms of the tassels should ideally be about a half inch above the top rim of the container. It is important to use a container size that keeps all of the tassels upright, so the tassels need to be snug but not so tight that the dye cannot move around the tassels.
- Fill a large glass measuring cup with water, and add a drop or two of liquid dish detergent. Heat in the microwave for one minute on high.
- Add this water to each container of tassels. You can use a funnel in the center of the tassels (pushed down to the bottom of the container), or you can simply push the tassels aside and carefully pour the water down the side of the container. Watch the water level rise, and the tassel absorption – the goal is for the tips of the tassels to remain dry. This is difficult, though, because cotton is highly absorbent, so do not worry if the entire tassel is damp.
- After 15 minutes, squeeze out the tassels while wearing gloves. Make sure to keep the tassels smooth and compact. Place the tassels on a paper towel and carefully wrap them up to further dry the tassels (they should be damp, but not wet).
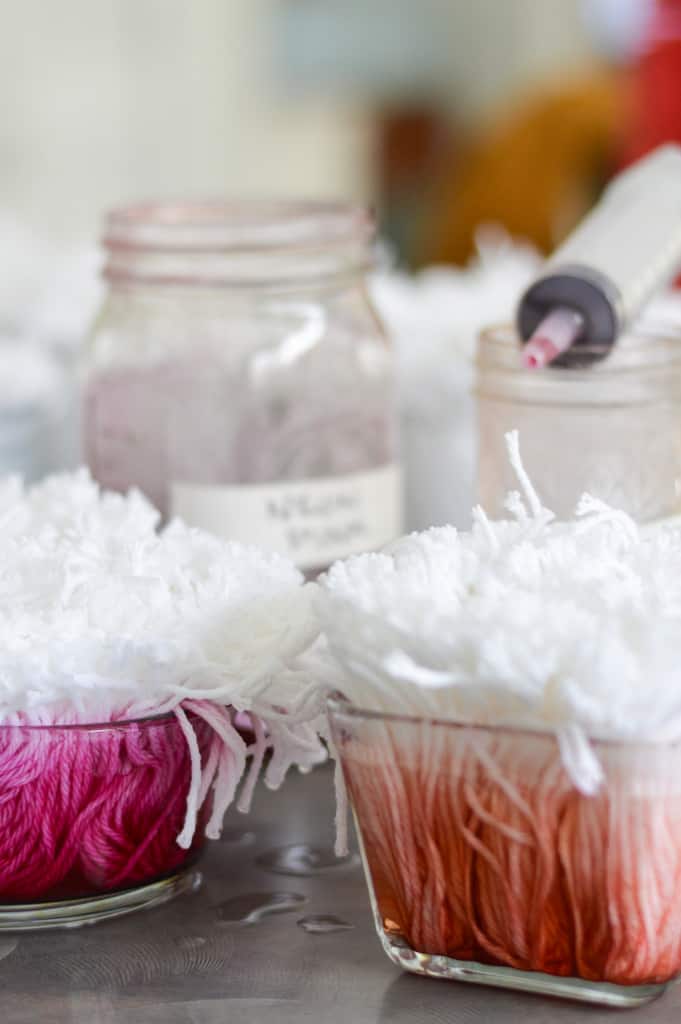
- Pour out any remaining water in the dyeing containers. Put the damp tassels back into the dyeing containers, again, with the tops down and bottoms up.
- Heat the dyes in the microwave for one minute on high.
- Add dye to each tassel container. If you don’t have enough containers to dye all of the tassels at the same time, just work in batches. Use the same technique to add the dye that you used to add the hot water – either a funnel or pour carefully down the side of the container. A non-medical syringe also works well for this.
- Watch the dye level closely as the yarn absorbs the dye… I added dye right to the top of the dyeing container so that the half inch or so of yarn that was above the rim of the container stayed mostly white.
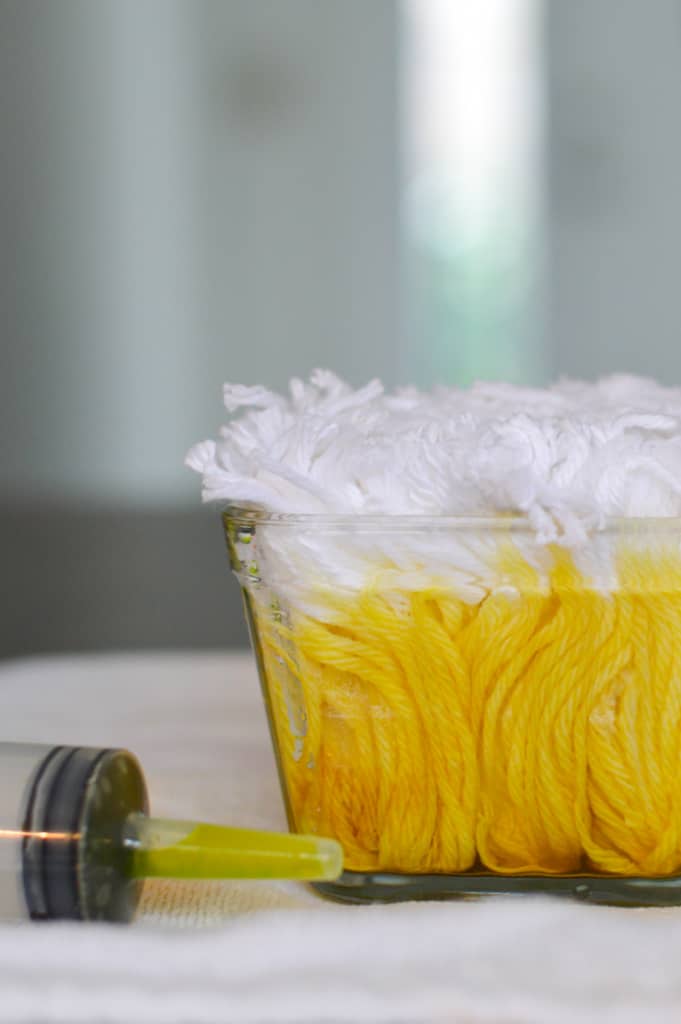
- Leave the tassels in the dye for 5 – 10 minutes.
- With gloves on, carefully take the tassels out of the dye, and squeeze them out over the sink. Set the tassels on a rag towel.
- After 30 minutes, rinse the tassels under running water. This will eliminate any extra dye, as well as any salt in the tassels. Squeeze out as much water as you can.
- If you have a drying rack, you can hang the tassels on this, or you can dry them on a rag towel. It is important to keep the tassel strands straight and untangled during the drying process.


TASSEL TREE CONSTRUCTION
- Plug in glue gun.
- Place the ruler along the tree form. Measure 3.5” from the bottom and mark with chalk. Then mark every 2.5” going up the tree. There will be 5 marks, leaving .5” at the top of the tree.
- Cut 5 lengths of white cotton yarn: 22”, 20”, 18”, 16” and 12”.
- Starting with the 22” strand, select 12 tassels for the bottom row of the tree. I used four Neon Green tassels, four Poolside tassels, and fourNeon Purple tassels. Tie the tassels to the strand, using the longer ties on each tassel.
- Space the tassels evenly, then wrap the strand around the tree form, at the first chalk mark to check the spacing – move the tassels closer together or further apart as needed to wrap evenly around the tree form. Once the spacing is correct, tie the strand on the tree form at the proper chalk mark.
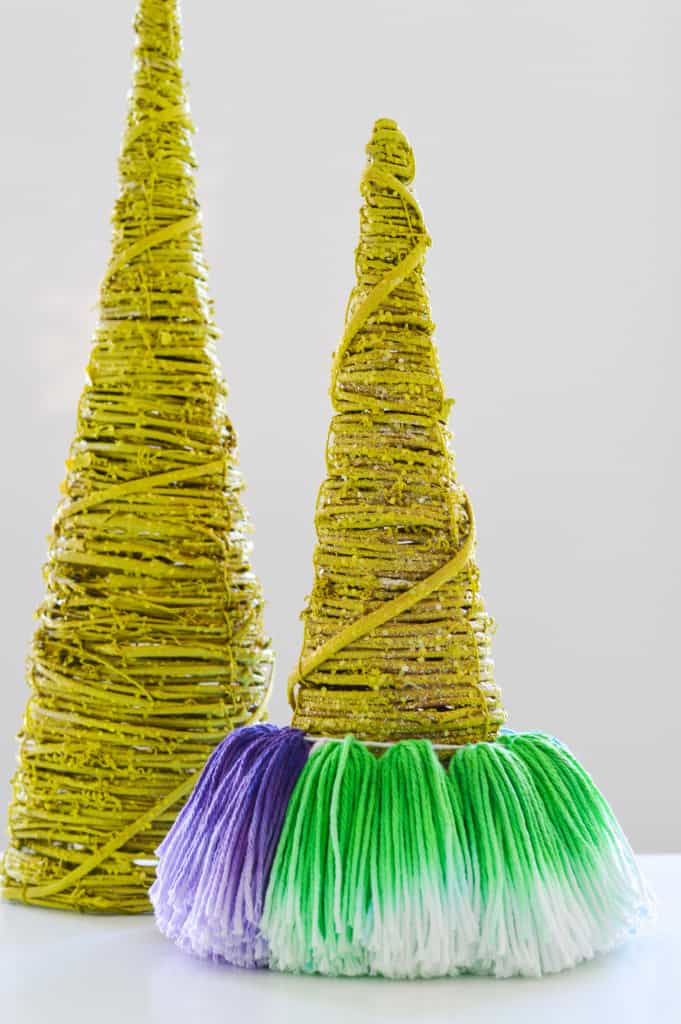
- Trim any visible long tie strands so that they are even with the tassels.
- Once the tassel tier looks even, use the glue gun to secure the strand to the tree form in several spots. Add a dab of hot glue to the knot in the strand to keep it secure.

- Repeat this process for the rest of the tiers. Tier two: four Neon Green, three Poolside, and four Neon Purple. Tier three: four Neon Green, three Poolside, and three Neon Purple. Tier four: three Shocked Yellow, two Island Aqua, and three Pastel Lavender. Tier five: two Shocked Yellow, two Island Aqua and two Pastel Lavender. As you add each tier, be sure to keep each color in its column.
- Take the remaining three tassels, and carefully cut the tie strings off each tassel. Cut a new 11” tie string and tie all three colors together to create one big tassel. Open this tassel up so that each color is like a piece of a pie. You will hot glue the center of this to the top of the tree so that each color matches the color underneath it. Once the glue has dried, you can trim this tassel to blend it into the tree. Refer to the photo to see how the short strands at the top create a spiky effect.
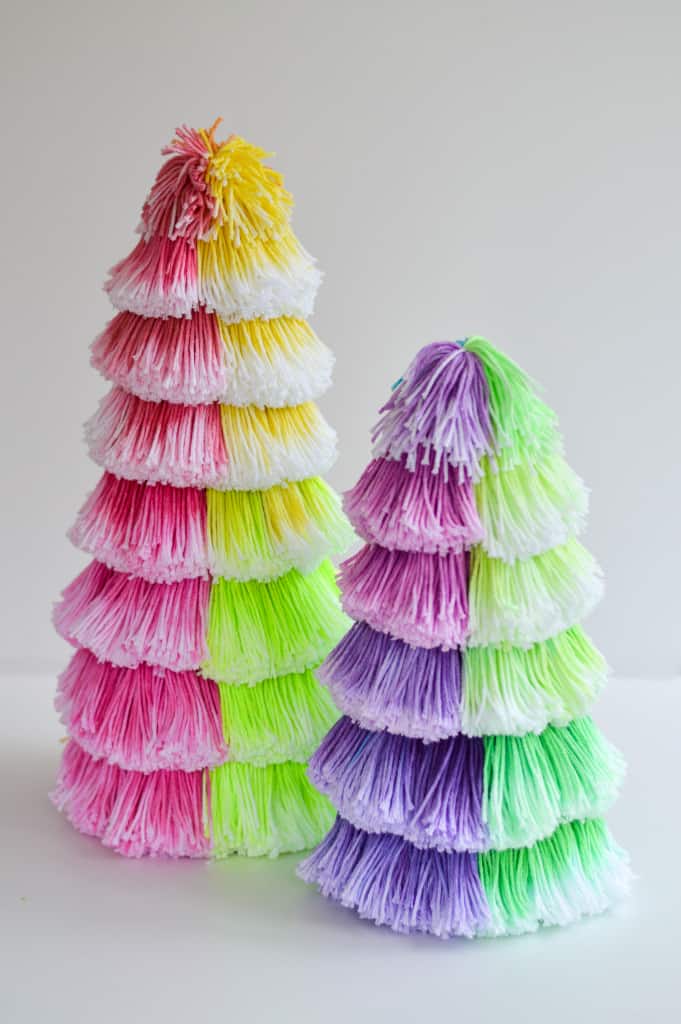
- Use your fingers or a wide-toothed comb to gently groom the entire tree.


Posts You May Like
