
Supplies
- Rit Indigo Shibori Tie-Dye Kit
- (2) 9” x 7” rectangles of 100% cotton fabric
- (2) Pieces of ¼ inch elastic cut to 6.5 inches
- Plastic Container
- Binder Clips
- Salt
- Measuring Cup
- Plastic Table Cover
- Paper Towels
- Sewing Machine/Thread
Time
1-2 Hours Total: {{ partial.tYDT.total }}
Difficulty
Beginner Total: {{ partial.t6BT.total }}
Instructions
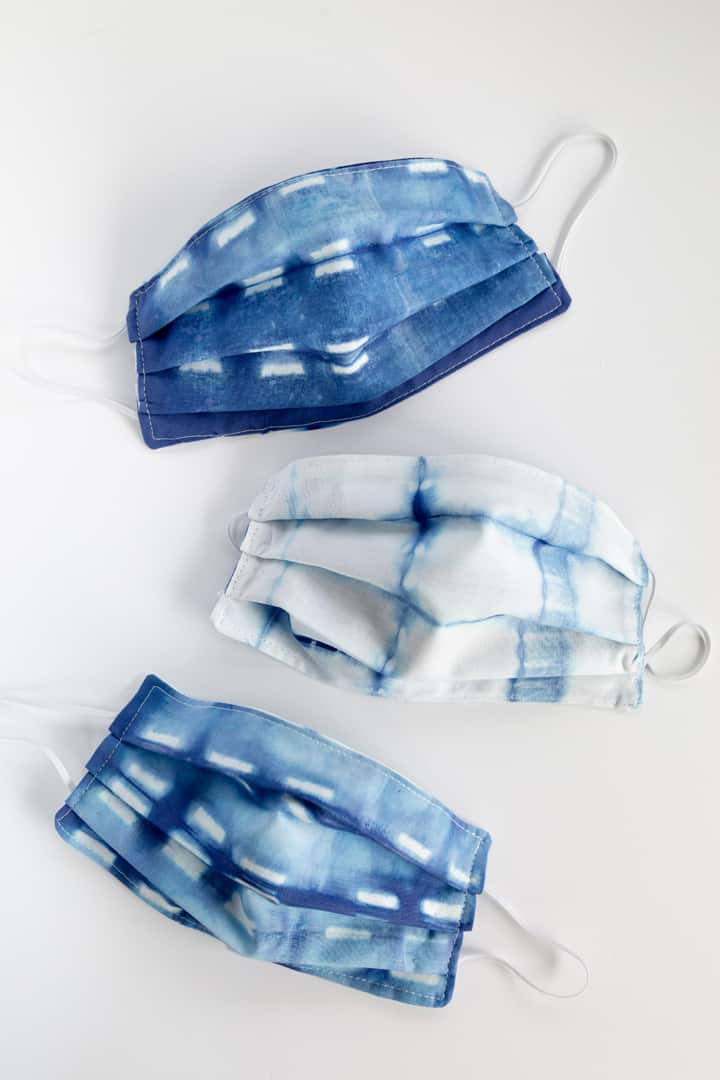
How to Create a Shibori Dyed Face Mask:
- Cover work area with plastic table cover and have paper towels handy to protect against possible spills.
- Wet fabric.
- To create a traditonal Itajime pattern, accordian fold or “fan fold” the fabric in 4 1/2″ wide folds down the length of the fabric. This will form a long rectangle. For more pattern variations, vary the size and width of the folds.
- Accordian fold or fan fold the long rectangle into a 4 1/2″ fabric square.
- Sandwich the fabric square between the 4″ blocks of wood.
- Secure “sandwich” with rubber bands to tightly hold the fabric square together.
- Fill a plastic container with 1.5 gallons of the hottest tap water. The water should be ideally 140F. If tap water is not hot enough, heat water on stove and add it to the dyebath.
- To enhance the the color, add one cup of salt. Add 1 teaspoon of liquid dish detergent to help promote level dyeing. Stir well.
- Wearing rubber gloves, add 1/4 cup of well-shaken Indigo dye to dyebath.
- Add fabric sandwich to the dyebath. For high contrast pattern, keep the sandwich in the dyebath for about 3-5 minutes to keep the wrapped part dye-free. For more color and less white areas, leave the wrapped fabric in the dyebath for 10 to 20 minutes.
- When desired color is achieved, removed wrapped fabric from the dyebath. Do not remove wood blocks.
- We strongly recommend using Rit ColorStay Dye Fixative immediately after dyeing and before washing. It enhances the color, increases color retention and prevents dye from bleeding into the white areas. Follow package instructions.
- Rinse in cool water until rinse water begins to run clear.
- Carefully remove the wood blocks and rubber bands. Unfold the fabric.
- Wash in warm water with a mild detergent, rinse and dry.
How to Create a Shibori Dyed Fabric Using Binder Clips:
- Gather supplies and cover work area.
- Accordion fold or fan fold the fabric in 4 1/2″ wide folds down the length of the fabric. This will form a long rectangle. For more pattern variations, vary the size and width of the folds.
- Accordian fold or fan fold the long rectangle into a 4 1/2″ fabric square.
- Secure the folded fabric by placing binder clips around the edges.
- Fill a plastic container with 1.5 gallons of very hot water. The water should be ideally 140F. If tap water is not hot enough, heat water on stove and add it to the dyebath.
- To enhance the the color, add one cup of salt. Add 1 teaspoon of liquid dish detergent to help promote level dyeing. Stir well.
- Wearing rubber gloves, add 1/4 cup of well-shaken Indigo dye to dyebath.
- Add the clipped fabric to the dyebath. For high contrast pattern, keep the clipped fabric in the dyebath for about 3-5 minutes to keep the wrapped part dye-free. For more color and less white areas, leave the clipped fabric in the dyebath for 10 to 20 minutes.
- When desired color is achieved, removed clipped fabric from the dyebath. Do not remove the binder clips.
- We strongly recommend using Rit ColorStay Dye Fixative immediately after dyeing and before washing. It enhances the color, increases color retention and prevents dye from bleeding into the white areas. Follow package instructions.
- Rinse in cool water until rinse water begins to run clear.
- Carefully remove the binder clips. Unfold the fabric.
- Wash in warm water with a mild detergent, rinse and dry.
How to Sew a Face Mask:
- Lay to pieces of Shibori dyed 9″ x 7″ fabric together.
- Starting at the center of the bottom edge, sew to the first corner and stop.
- Sew the elastic with the edge out into the corner. A few stitches forward and back will hold this.
- Sew to the next corner, stop, and bring the other end of the same elastic to the corner and sew a few stitches forward and back.
- Now sew across the top of the mask to the next corner. Again, put a piece of elastic with the edge out.
- Sew to the next corner and sew in the other end of the same piece of elastic.
- Sew across the bottom leaving 1.5″ to 2″ open. Stop and cut the thread.
- Turn inside out.
- Pin 3 tucks on each side of the mask. Make sure the tucks are the same direction.
- Sew around the edge of the mask twice.
- Standard face mask is ready to wear!

Posts You May Like
